I've decided to move all of my GIMP and other photography tutorials onto a different blog. You can find them here:
http://smallbusinessdiy.blogspot.com/search/label/photography
Thursday, January 1, 2015

Saturday, July 5, 2014
Special Request for A Custom Commemorative Hoodie
A lot of my work involves fulfilling special requests. Most of the time, they are variations on something I've already done. (For example, stitching my custom nautical flags on a tall t-shirt rather than the standard cut.) Sometimes, however, I get a request that is truly unique. Late last year, I had a request for a custom commemorative hoodie from a group of USMC spouses.
I am local to the USMC base at Quantico, Virginia. The base trains a lot of marines for a variety of different courses: Officer Candidate School (OCS), The Basic School (TBS), and host of smaller courses. A lot of these training and selection sessions are grueling, with men and women pushing themselves to the limits of physical and mental endurance. The officers who slog through the mud together often design a commemorative t-shirt before they part their separate ways for other assignments.
In my case, I was contacted by a group of military spouses who wanted their own commemorative hoodie. (The spouses often form close-knit support groups while their significant other is frequently absent for training.) Initially, they were thinking of getting their hoodies silk-screened. However, silkscreened garments begin to flake after several wash cycles, whereas embroidery wears better over time. So, they wanted to compare their options.
Settling On a Design
The spouses had already come up with a design of what they were thinking of using for a 1-color silkscreen design. It had a set of dog tags with three lines of text below it, which would take up most of the front of a red hoodie. They provided me with a basic graphic and then I came back with a mock-up photo. Since the design was simple, I was able to give them a mock-up within 24 hours.
Based off what I knew they wanted, I recommended a few changes for embroidery within the mockup:
1) Embroidery doesn't require a separate silkscreens for each new color, so I proposed using more than one color. Namely, two shades of grey for the dog tags, and one shade of another color for the text. Some of spouses had expressed concern about a red hoodie, so I created my mock-up using yellow text on a navy blue hoodie, with the note that the colors were flexible.
2) Since I didn't have to worry about flat white text blending in with a flat white set of dog tags, I suggested overlaying the text over the chain of the dog tags. I thought that having the two elements overlap would create a more fashionable garment. I thought this would be particularly nice since most of the members of the group were women.
3) I also changed a few styling details. For example, the original had the fabric of the garment show through parts of the dog tag for the text. I wasn't limited to only one color (I can thread up to six colors on my machine at once), so I used another shade of grey. I knew that stitching the text on top of the tag was the best method for ensuring that the text would look good on a finished garment. (As opposed to trying to define the tag so that the fabric showed through. At this scale, that would be difficult to do giving that I'm working with thread and not ink.) I also changed the chain a bit. The original had a line of little, disconnected circles for the chain. I adapted the design to something that would be more production-friendly.
Why is the Chain More Production-Friendly This Way?
 Creating an embroidery design off of a graphic requires re-drawing every single element of the design into the computer along with notes for the computer about what types of stitches need to be used for each element. It can be very time consuming, so in this case, I picked a method that would save time both for creating the design and stitching it.
You see, I could draw a tiny little circle (individually drawing it in using a mouse or tablet on the computer screen) for every single one of those little balls on that chain. This would involve drawing the circle and then telling the computer the stitch type (column) and the direction of stitching for every single little dot. It takes about 10 seconds to define each dot, but then I need to make sure they're in the right places, all the same size, with the proper stitch direction, and then I'd need to audit the stitching order and sequence to ensure the machine isn't going to stitch them in a wonky way. It may easily take an hour just to create the chain using this method.
If it was really, really necessary to match the graphic exactly, I could even tell the embroidery design to trim the thread after stitching every single one of those little circles, so there's no connecting thread between each circle. This would, mind you, add about almost half a minute to the total stitching time for every single trim once I was actually stitching this out. I think there are about a 100 little dots in that original graphic...
I didn't see a point to adding another 40-50 minutes to the time it takes to sew out each hoodie just for the sake of copying the graphic exactly. Instead, I opted for using a motif stitch. With this, I merely define a path, and then specify a repeating motif to be placed along the path. From there, I can adjust the spacing between the motifs. This gave me a similar look, but with a lot less work. This motif uses less thread than little balls of satin stitching, so it stitches out more quickly and allows text to be layered over it more easily. I also liked the idea of using a decorative motif because I thought it created a much more interesting and beautiful design. I like the contrast between the motif stitch on the chain, the fill stitch of the dog tags, and the satin stitches of the text and dog tag shadow. (Yes, I think a lot about my designs. Converting graphics into embroidery, or digitizing, requires thinking through lots of minute little details, which is why many embroiderers do not digitize.)
Approval
I sent three photos to my clients, noting that some things like text and hoodie colors were flexible. One was the design proof I shared above. The other two were mock-ups to show what the front and back would look like for the finished garment. I also quoted them a price, which was higher than silkscreening because embroidery is more labor intensive.
They were thoroughly happy with the final result. Pretty much everyone commented on how nice they were when they were handed out. One spouses told me that she received several compliments wearing it for the first time on base.
I am local to the USMC base at Quantico, Virginia. The base trains a lot of marines for a variety of different courses: Officer Candidate School (OCS), The Basic School (TBS), and host of smaller courses. A lot of these training and selection sessions are grueling, with men and women pushing themselves to the limits of physical and mental endurance. The officers who slog through the mud together often design a commemorative t-shirt before they part their separate ways for other assignments.
 |
| This is what they were thinking of using for a silkscreen design. Note how it fills up most of the hoodie, only uses one color, and has the text below the tags. |
Settling On a Design
The spouses had already come up with a design of what they were thinking of using for a 1-color silkscreen design. It had a set of dog tags with three lines of text below it, which would take up most of the front of a red hoodie. They provided me with a basic graphic and then I came back with a mock-up photo. Since the design was simple, I was able to give them a mock-up within 24 hours.
Based off what I knew they wanted, I recommended a few changes for embroidery within the mockup:
1) Embroidery doesn't require a separate silkscreens for each new color, so I proposed using more than one color. Namely, two shades of grey for the dog tags, and one shade of another color for the text. Some of spouses had expressed concern about a red hoodie, so I created my mock-up using yellow text on a navy blue hoodie, with the note that the colors were flexible.
2) Since I didn't have to worry about flat white text blending in with a flat white set of dog tags, I suggested overlaying the text over the chain of the dog tags. I thought that having the two elements overlap would create a more fashionable garment. I thought this would be particularly nice since most of the members of the group were women.
 |
| The design proof. There are several changes to the original design for the sake of fashion and production. |
Why is the Chain More Production-Friendly This Way?
Creating an embroidery design off of a graphic requires re-drawing every single element of the design into the computer along with notes for the computer about what types of stitches need to be used for each element. It can be very time consuming, so in this case, I picked a method that would save time both for creating the design and stitching it. You see, I could draw a tiny little circle (individually drawing it in using a mouse or tablet on the computer screen) for every single one of those little balls on that chain. This would involve drawing the circle and then telling the computer the stitch type (column) and the direction of stitching for every single little dot. It takes about 10 seconds to define each dot, but then I need to make sure they're in the right places, all the same size, with the proper stitch direction, and then I'd need to audit the stitching order and sequence to ensure the machine isn't going to stitch them in a wonky way. It may easily take an hour just to create the chain using this method.
If it was really, really necessary to match the graphic exactly, I could even tell the embroidery design to trim the thread after stitching every single one of those little circles, so there's no connecting thread between each circle. This would, mind you, add about almost half a minute to the total stitching time for every single trim once I was actually stitching this out. I think there are about a 100 little dots in that original graphic...
I didn't see a point to adding another 40-50 minutes to the time it takes to sew out each hoodie just for the sake of copying the graphic exactly. Instead, I opted for using a motif stitch. With this, I merely define a path, and then specify a repeating motif to be placed along the path. From there, I can adjust the spacing between the motifs. This gave me a similar look, but with a lot less work. This motif uses less thread than little balls of satin stitching, so it stitches out more quickly and allows text to be layered over it more easily. I also liked the idea of using a decorative motif because I thought it created a much more interesting and beautiful design. I like the contrast between the motif stitch on the chain, the fill stitch of the dog tags, and the satin stitches of the text and dog tag shadow. (Yes, I think a lot about my designs. Converting graphics into embroidery, or digitizing, requires thinking through lots of minute little details, which is why many embroiderers do not digitize.)
Approval
I sent three photos to my clients, noting that some things like text and hoodie colors were flexible. One was the design proof I shared above. The other two were mock-ups to show what the front and back would look like for the finished garment. I also quoted them a price, which was higher than silkscreening because embroidery is more labor intensive.
 |
| I sent this mockup to show human scale. |
 |
| Some spouses wanted their name on the back. |
They decided that they liked the design better and would be willing to pay a little more for it. By the end of the week, they had their hoodies in hand. (It was, after all, a local delivery that did not require shipping to the client.)
 |
| The Finished Commemorative Hoodie |
Wednesday, October 30, 2013
Lemon Cream Cheese Crumble Bars
I came up with this recipe after my 2-year-old found the cinnamon-sugar graham crackers in my pantry. Unfortunately, he tried to 'open' one of the three smaller packages inside. He didn't succeed in getting to the crackers (which is great, I don't like having sugared-up kids), but he did crush them inside the package pretty thoroughly. Not wanting to toss out perfectly good food, I came up with this recipe, which is a variation of the Lemon Cheese Bars in Cake Mix Doctor by Ann Byrn.
I used a large round spring-form pan, but you can use a 9 x 13 baking pan instead. It doesn't need to be greased.
 1/3 box cinnamon sugar graham crackers, crushed to fine pieces
1 pkg. yellow cake mix (15.25 oz.)
1/2 cup oil
2 eggs
1 pkg. cream cheese (8 oz.)
1/3 cup sugar
2 1/2 tbsp. lemon juice
4 whole cloves, ground
1 tbsp. dried orange peel
1) You'll be toasting the crust and then baking it again once the filling is done, so preheat oven to 350°F
2) Mix crushed graham crackers, cake mix, oil, and 1 egg in large mixing bowl until mixture is crumbly. Reserve 1 1/2 cup for topping. Use the rest to make a crust in the bottom of your pan. Just press it with your fingers get an even coating on the bottom
.
3) Bake crust in oven for 13 to 15 minutes. Remove from oven and set aside, but keep the oven on.
4) For the filling, beat the cream cheese until fluffy (about 30 seconds if the cream cheese isn't too cold). Then add the rest of the ingredients - sugar, lemon juice, remaining egg, cloves, and orange peel. Then spread the filling in the crust with a rubber spatula. Sprinkle with reserved filling.
5) Bake until the crust is golden and the filling just starts to set (won't jiggle freely). In a glass 9 x 13 inch baking pan, this will take about 15 minutes. It took me a bit longer in my round metal springform pan.
6) Let it cool for about 30 minutes before you cut and serve. I garnished mine with fresh strawberry.
Almost anything made with spice-infused cream cheese seems to taste better the next day if left in the fridge overnight, so this is a great recipe to prepare well in advance of guests.
I used a large round spring-form pan, but you can use a 9 x 13 baking pan instead. It doesn't need to be greased.
 1/3 box cinnamon sugar graham crackers, crushed to fine pieces
1 pkg. yellow cake mix (15.25 oz.)
1/2 cup oil
2 eggs
1 pkg. cream cheese (8 oz.)
1/3 cup sugar
2 1/2 tbsp. lemon juice
4 whole cloves, ground
1 tbsp. dried orange peel
1) You'll be toasting the crust and then baking it again once the filling is done, so preheat oven to 350°F
2) Mix crushed graham crackers, cake mix, oil, and 1 egg in large mixing bowl until mixture is crumbly. Reserve 1 1/2 cup for topping. Use the rest to make a crust in the bottom of your pan. Just press it with your fingers get an even coating on the bottom
.
3) Bake crust in oven for 13 to 15 minutes. Remove from oven and set aside, but keep the oven on.
4) For the filling, beat the cream cheese until fluffy (about 30 seconds if the cream cheese isn't too cold). Then add the rest of the ingredients - sugar, lemon juice, remaining egg, cloves, and orange peel. Then spread the filling in the crust with a rubber spatula. Sprinkle with reserved filling.
 |
| Use a rubber spatula to spread the filling over the pre-toasted crust. |
5) Bake until the crust is golden and the filling just starts to set (won't jiggle freely). In a glass 9 x 13 inch baking pan, this will take about 15 minutes. It took me a bit longer in my round metal springform pan.
6) Let it cool for about 30 minutes before you cut and serve. I garnished mine with fresh strawberry.
Almost anything made with spice-infused cream cheese seems to taste better the next day if left in the fridge overnight, so this is a great recipe to prepare well in advance of guests.
Thursday, September 19, 2013
Ornament Give Away
I'm hosting a give away in conjunction with Christie Cottage's blog for one of my Jacobean Initial Monogram Ornaments. Each one is embroidered with a single initial in the historical Jacobean style, which was popular during the reign of James I as well as in Colonial America.
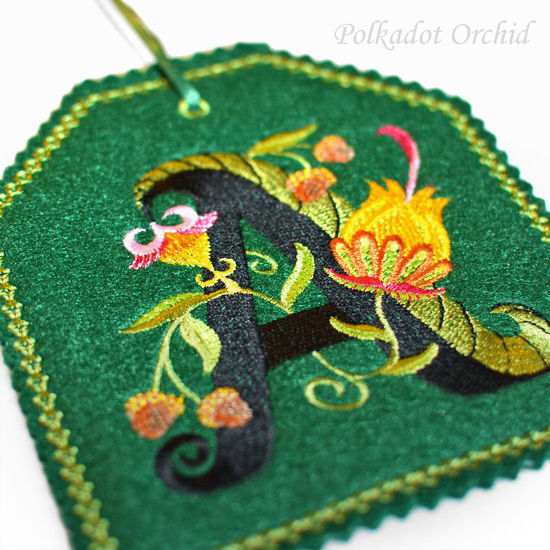
Each one is embroidered in my studio here in Stafford, Virginia. They're one of my favorite patterns that I make, because the embroidery is drop-dead-gorgeous.
If you're interested in winning one for free, head over to the Give-Away at Christie Cottage's Blog to enter. It's open from now until October 2, 2013.
Wednesday, August 21, 2013
Lime Cake
I believe in having a well-stocked pantry. I have a spice collection that includes ingredients that some people have never even heard of, more or less used (including my husband before I married him). At a previous address, I'd taken over portions of our laundry closet, our front entry closet, and our cabinets to store various sundry ingredients. Usually, the only thing that I really need to pick up from the store to make a particular dish is fresh produce. I like having a wide variety of base ingredients so I can easily make what I want. It is a great asset to my kitchen.
However, when you need to move, it becomes a great liability.
I originally came up with this recipe while I was trying to eat through my stockpile of food in preparation of an upcoming move. I was on a search & destroy mission to use as many citrus ingredients from my kitchen as possible. This resulted in delicious lime cake. I came across the recipe again recently and decided to share.
This cake tastes best if you can make the frosting the day before and let it sit in the refrigerator overnight to let the lime taste sink into the cream-cheese frosting.
 Lime Cake
Oil & flour for dusting the pan
1 pkg (18.25 oz.) Lemon Cake Mix
1 cup whole milk
1 stick butter, melted (I used real, unsalted butter)
3 eggs
1 tbsp. vanilla extract
1 tsp. lemon extract
1 pkg (0.3 oz.) lime Jell-O
Preheat oven to 350°F. You will want to get out some butter & cream cheese to come to room temperature if you haven't done so already. (BTW trying to speed the process by warming cream cheese and butter up in the microwave does not produce the same results.)
Mix all ingredients in a bowl. Pour into pan. Bake until golden brown & springs back lightly when pressed. I used two 9-inch round spring-form pans, and it took a little over 21 minutes.
Frosting
1 pkg (8 oz.) cream cheese, at room temp.
1 stick (8 tbsp.) butter, at room temp. (NEVER use margarine for frosting, it just doesn't work)
Lime zest, the more the merrier (I used 1/2 of a lime, but should have used more)
1/2 box (1 lbs. box) powdered sugar, or just under 2 cups (you could use as much as 3 3/4 cup powdered sugar, but that's too sweet for me & it provides more frosting than I' prefer)
1 tsp. vanilla extract
1 tsp. lemon extract
Blend cream cheese, butter, & zest with electric mixer. Gradually add powdered sugar. Add vanilla and lemon extract, then beat until fluffy (about a minute). Frost cake once it has cooled enough that it won't melt the frosting.
Yes, this might sound weird with the Jell-O & all, but it's quite good (and it allowed me to use up the Jell-o, which I'd probably never use otherwise because gelatin is not my favorite food item). The cake is even better the next day because the zest gets a chance to seep into the frosting overnight. It's also a lovely - though unusual - chartreuse color on the inside. Feel free to add some lime zest in the cake itself for even more citrus flavor.
As a side note, a part of me is sorely tempted to throw my son a Mad Scientist Birthday Party. If I do, I might use this cake, just because it has such an unusual color for a cake.
Does anyone else ever feel like a mad scientist when they cook?
However, when you need to move, it becomes a great liability.
I originally came up with this recipe while I was trying to eat through my stockpile of food in preparation of an upcoming move. I was on a search & destroy mission to use as many citrus ingredients from my kitchen as possible. This resulted in delicious lime cake. I came across the recipe again recently and decided to share.
This cake tastes best if you can make the frosting the day before and let it sit in the refrigerator overnight to let the lime taste sink into the cream-cheese frosting.
 Lime Cake
Oil & flour for dusting the pan
1 pkg (18.25 oz.) Lemon Cake Mix
1 cup whole milk
1 stick butter, melted (I used real, unsalted butter)
3 eggs
1 tbsp. vanilla extract
1 tsp. lemon extract
1 pkg (0.3 oz.) lime Jell-O
Preheat oven to 350°F. You will want to get out some butter & cream cheese to come to room temperature if you haven't done so already. (BTW trying to speed the process by warming cream cheese and butter up in the microwave does not produce the same results.)
Mix all ingredients in a bowl. Pour into pan. Bake until golden brown & springs back lightly when pressed. I used two 9-inch round spring-form pans, and it took a little over 21 minutes.
Frosting
1 pkg (8 oz.) cream cheese, at room temp.
1 stick (8 tbsp.) butter, at room temp. (NEVER use margarine for frosting, it just doesn't work)
Lime zest, the more the merrier (I used 1/2 of a lime, but should have used more)
1/2 box (1 lbs. box) powdered sugar, or just under 2 cups (you could use as much as 3 3/4 cup powdered sugar, but that's too sweet for me & it provides more frosting than I' prefer)
1 tsp. vanilla extract
1 tsp. lemon extract
Blend cream cheese, butter, & zest with electric mixer. Gradually add powdered sugar. Add vanilla and lemon extract, then beat until fluffy (about a minute). Frost cake once it has cooled enough that it won't melt the frosting.
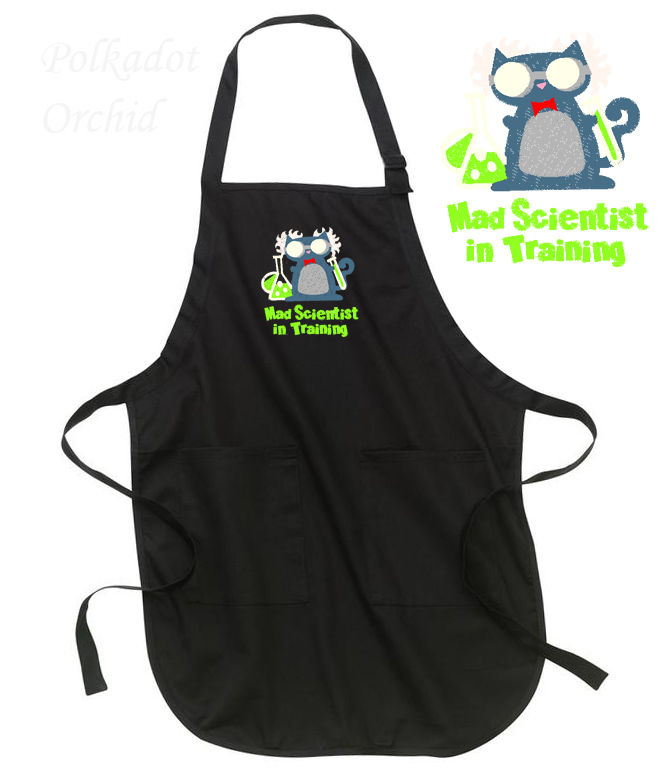 |
| I need to start cooking in this apron... |
Yes, this might sound weird with the Jell-O & all, but it's quite good (and it allowed me to use up the Jell-o, which I'd probably never use otherwise because gelatin is not my favorite food item). The cake is even better the next day because the zest gets a chance to seep into the frosting overnight. It's also a lovely - though unusual - chartreuse color on the inside. Feel free to add some lime zest in the cake itself for even more citrus flavor.
As a side note, a part of me is sorely tempted to throw my son a Mad Scientist Birthday Party. If I do, I might use this cake, just because it has such an unusual color for a cake.
Does anyone else ever feel like a mad scientist when they cook?
Wednesday, August 7, 2013
Ginger Peach Berry Cobbler
I'm not normally a peach person - at least not a fresh peach person. I've never cared for the fuzzy texture. However, sometimes peaches are on sale at the grocery store for far cheaper than anything else. When they do, I try to make them into lovely peach cobbler.
The following recipe is my own variation off of the Peach Raspberry Cobbler from Joy of Cooking:
 6 ripe peaches (1 1/2 - 1 3/4 lbs.)
1 cup frozen raspberry/blueberry/blackberry mixture
1 cup frozen wild blueberries
*1 tbsp. tapioca
2/3 cup sugar, divided
1 cup flour
1 tsp. baking powder
1/4 tsp. salt
1 tsp. cinnamon
1 tbsp. ginger
1 stick butter, softened
1 egg
1/4 cup sour cream
I used a large, round corningware dish (9" diameter), but you could use anything with a 2-qt. capacity. Just so long as it's enameled or glass, there's no need to butter it.
1) Preheat Oven to 350°F
2) Slice up the peaches and place on the bottom of your baking dish. Top with the frozen berries.
3) Sprinkle berries with HALF of the sugar (1/3 cup sugar) and the tapioca. You'll use the other half later for the batter. Set the fruit aside to macerate while you prepare the batter for the top. (BTW, macerating fruit refers to when you use sugar to draws the moisture out of the fruit, creating a syrupy liquid around the fruit.)
4) Whisk flour, baking powder, salt, cinnamon, and ginger together.
5) In a separate bowl, beat together the butter and remaining 1/3 cup sugar.
6) Beat in the egg.
7) Beat in the dry ingredients. Fold in sour cream.
8) Spread the batter over the top of the fruit. Leave about 1/4 inch of space between the topping and the edge of the pan so the topping can expand a bit during cooking.
Note: if you use a spatula to spread the topping, you will end up with a smooth-topped cobbler. If you want a cobbler with a nubbly, irregular texture on the top, drop spoonfuls of batter over the fruit.
9) Bake at 350° for about 40-45 minutes - it's done when the top is golden brown and the fruit is fork tender.
Cool for 15 minutes before serving. Consider serving with whipped cream or ice cream.
*I didn't include tapioca when I made this recipe for this photo and it came out a bit soupy because I used frozen rather than fresh berries. If I were to make it again, I would include the tapioca to absorb some of the water from the frozen berries. It's not needed if you're only using fresh fruit.
The following recipe is my own variation off of the Peach Raspberry Cobbler from Joy of Cooking:

1 cup frozen raspberry/blueberry/blackberry mixture
1 cup frozen wild blueberries
*1 tbsp. tapioca
2/3 cup sugar, divided
1 cup flour
1 tsp. baking powder
1/4 tsp. salt
1 tsp. cinnamon
1 tbsp. ginger
1 stick butter, softened
1 egg
1/4 cup sour cream
I used a large, round corningware dish (9" diameter), but you could use anything with a 2-qt. capacity. Just so long as it's enameled or glass, there's no need to butter it.
1) Preheat Oven to 350°F
2) Slice up the peaches and place on the bottom of your baking dish. Top with the frozen berries.
3) Sprinkle berries with HALF of the sugar (1/3 cup sugar) and the tapioca. You'll use the other half later for the batter. Set the fruit aside to macerate while you prepare the batter for the top. (BTW, macerating fruit refers to when you use sugar to draws the moisture out of the fruit, creating a syrupy liquid around the fruit.)
4) Whisk flour, baking powder, salt, cinnamon, and ginger together.
5) In a separate bowl, beat together the butter and remaining 1/3 cup sugar.
 |
| Part-way through the process: adding the topping over the fruit. This photo was taken before I spread it around. |
7) Beat in the dry ingredients. Fold in sour cream.
8) Spread the batter over the top of the fruit. Leave about 1/4 inch of space between the topping and the edge of the pan so the topping can expand a bit during cooking.
Note: if you use a spatula to spread the topping, you will end up with a smooth-topped cobbler. If you want a cobbler with a nubbly, irregular texture on the top, drop spoonfuls of batter over the fruit.
9) Bake at 350° for about 40-45 minutes - it's done when the top is golden brown and the fruit is fork tender.
Cool for 15 minutes before serving. Consider serving with whipped cream or ice cream.
*I didn't include tapioca when I made this recipe for this photo and it came out a bit soupy because I used frozen rather than fresh berries. If I were to make it again, I would include the tapioca to absorb some of the water from the frozen berries. It's not needed if you're only using fresh fruit.
Thursday, August 1, 2013
Gift for a New Baby
Recently my husband asked me to make baby gifts for three of his co-workers who were expecting new additions in the near future. I love to make handmade gifts. However, I tend to shy away from making the traditional baby blanket.
Now the most recent ornament isn't the child's full name, but I think the initial alone is gorgeous. It's a beautiful, traditional-looking ornament, which has a lot of color. The embroidery harks back to the Jacobean style, which developed during the first quarter of the 17th Century during the reign of King James I. The style was very popular and moved to Colonial America. I like the idea of giving a little bit of history with my gifts.
Why?
After the birth of my second child, I noticed that I had received A LOT of baby blankets between the birth of my first two children. 32 baby blankets to be exact, 7 of them lovingly handmade. In my case, I'm also a military spouse, so I know that most of my husband's co-workers are going to have to pack up everything they own and move cross-country every couple of years.
 |
| Handmade Embroidered Baby Blanket |
A lot of times with new babies, I have no idea if the family has really crafty relatives, godparents, or other very close friends. Nor do I know what other people are going to give them. I realize that they may (or may not) receive a lot of blankets as gifts. However, I know the family is going to have to move. A lot. And if they need to get rid of a lot of stuff to fit into a smaller home at their next duty station, then the blanket from grandma is probably going to mean more to them than the blanket from one of Daddy's Marine Corps buddies.
So what do you give a new baby when the parents don't have a lot of space or don't want to haul around a bunch of stuff through multiple moves?
Personalized Christmas Ornaments.
They're small. They're useful. They outlive the lifetime of the average baby blanket (babies outgrow most blankets by the time they're two, whereas a Christmas ornament may survive until the child starts out on his or her own). And the family is going to see it and remember who gave it to them at least once a year when they hang it on the tree. Since the ornament is personalized with the child's name or initial, it will probably become special to that child as he or she grows up and sees his or her name up on the family tree.
I've done a few variations on personalized ornaments in the past. For example, here's an ornament that doubles as a candy cane holder:
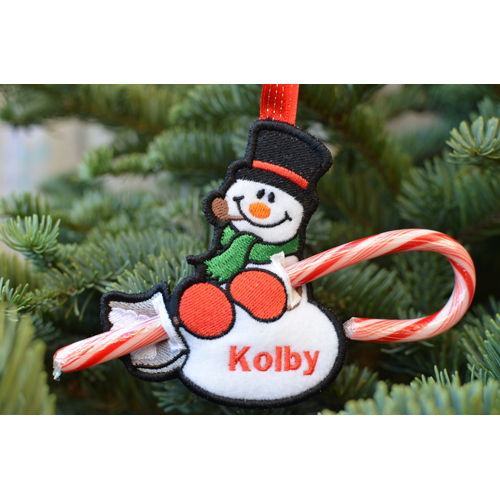 |
| Personalized Snowman Ornament |
This one uses metallic thread:
 |
| Xmas Ornament with Name in Metallic Silver Thread |
For this particular baby, I wanted to do something a little bit different. And here's what I came up with:
|
| Jacobean Initial Christmas Ornament |
Now the most recent ornament isn't the child's full name, but I think the initial alone is gorgeous. It's a beautiful, traditional-looking ornament, which has a lot of color. The embroidery harks back to the Jacobean style, which developed during the first quarter of the 17th Century during the reign of King James I. The style was very popular and moved to Colonial America. I like the idea of giving a little bit of history with my gifts.
 |
| I like to lay my threads against the fabric in a group so I can see how everything will look together. |
To make it, I had a lot of colors to coordinate. Sometimes people think embroidery is easy and that the machine does everything for you. It certainly speeds up the process, but I'm the one who picks the colors and materials. In this case, I went through my 200-some collection of colors and picked out the shades that I thought worked well both together and with the dark green fabric.
This was a bit more tricky because there are a lot of shades in the flowers, and I also had to account for those little acorns. (Acorns are a traditional motif in both Jacobean embroidery and the earlier blackwork style.)
 |
| Partway-through the stitching process. |
I ended up testing out about 4 different shades of pink before I found a light and dark tone that I was happy with. In this case, I wanted something that was bright and cheerful - appropriate for the birth of a new baby girl. I could have used different shades, but the result would have been a different look. (I could have used less saturated hues for a more subdued, antique look.)
 |
| The initial ornament is a decent size. Big enough to be seen on the tree without overwhelming it. |
From there, I got to stitch it. I have to make sure I stop at the right time to add a backing so you don't see the backside of the embroidery once it's on the tree. The final step is to add the decorative stitched border and to cut out the shape. Oh, and add the ribbon, which involves using a large needle threaded with satin ribbon, so I can have it go through the ornament where I've reinforced it with a ring of embroidered satin stitches.
I think the end result is perfect for a little girl. I hope the family loves it.
Oh, and there's one more thing I like about these ornaments. Sometimes, you want to get a personalized gift but the name is unusual or there are several different spelling variations. (My own name of Michelle could be spelled as Michele, for example.) With just the initial, you can go with either the first name or the last name, and you don't have to worry about accidentally using the wrong spelling variation.
Subscribe to:
Posts (Atom)