Thursday, August 1, 2013

Gift for a New Baby

Recently my husband asked me to make baby gifts for three of his co-workers who were expecting new additions in the near future. I love to make handmade gifts. However, I tend to shy away from making the traditional baby blanket.

Why?

After the birth of my second child, I noticed that I had received A LOT of baby blankets between the birth of my first two children. 32 baby blankets to be exact, 7 of them lovingly handmade. In my case, I'm also a military spouse, so I know that most of my husband's co-workers are going to have to pack up everything they own and move cross-country every couple of years. 

Handmade Embroidered Baby Blanket
A lot of times with new babies, I have no idea if the family has really crafty relatives, godparents, or other very close friends. Nor do I know what other people are going to give them. I realize that they may (or may not) receive a lot of blankets as gifts. However, I know the family is going to have to move. A lot. And if they need to get rid of a lot of stuff to fit into a smaller home at their next duty station, then the blanket from grandma is probably going to mean more to them than the blanket from one of Daddy's Marine Corps buddies. 

So what do you give a new baby when the parents don't have a lot of space or don't want to haul around a bunch of stuff through multiple moves?

Personalized Christmas Ornaments. 

They're small. They're useful. They outlive the lifetime of the average baby blanket (babies outgrow most blankets by the time they're two, whereas a Christmas ornament may survive until the child starts out on his or her own). And the family is going to see it and remember who gave it to them at least once a year when they hang it on the tree. Since the ornament is personalized with the child's name or initial, it will probably become special to that child as he or she grows up and sees his or her name up on the family tree. 

I've done a few variations on personalized ornaments in the past. For example, here's an ornament that doubles as a candy cane holder: 
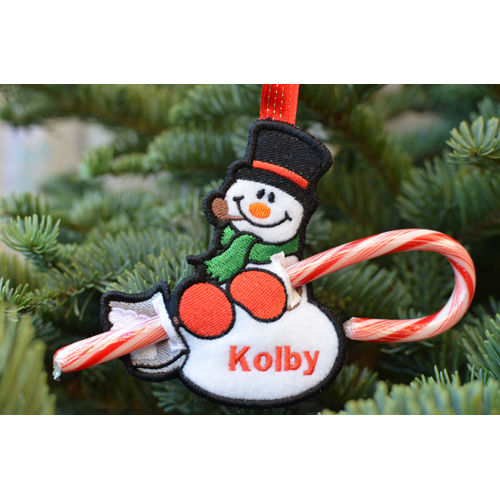
Personalized Snowman Ornament

This one uses metallic thread:
Xmas Ornament with Name in Metallic Silver Thread


For this particular baby, I wanted to do something a little bit different. And here's what I came up with: 
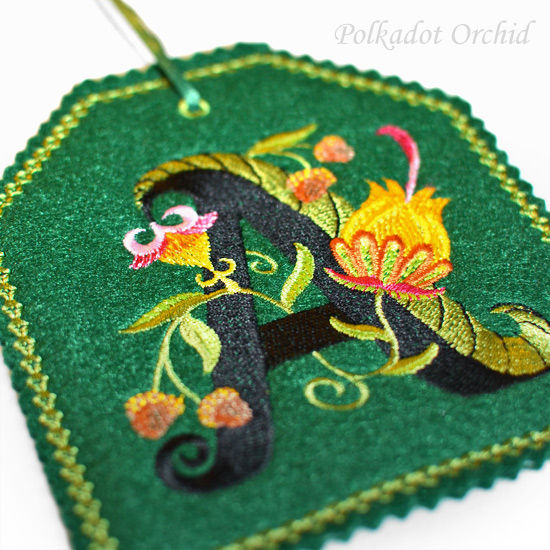
Jacobean Initial Christmas Ornament

Now the most recent ornament isn't the child's full name, but I think the initial alone is gorgeous. It's a beautiful, traditional-looking ornament, which has a lot of color. The embroidery harks back to the Jacobean style, which developed during the first quarter of the 17th Century during the reign of King James I. The style was very popular and moved to Colonial America. I like the idea of giving a little bit of history with my gifts.

I like to lay my threads against the
fabric in a group so I can see how
everything will look together. 
To make it, I had a lot of colors to coordinate. Sometimes people think embroidery is easy and that the machine does everything for you. It certainly speeds up the process, but I'm the one who picks the colors and materials. In this case, I went through my 200-some collection of colors and picked out the shades that I thought worked well both together and with the dark green fabric. 

This was a bit more tricky because there are a lot of shades in the flowers, and I also had to account for those little acorns. (Acorns are a traditional motif in both Jacobean embroidery and the earlier blackwork style.) 

Partway-through the stitching process.
I ended up testing out about 4 different shades of pink before I found a light and dark tone that I was happy with.  In this case, I wanted something that was bright and cheerful - appropriate for the birth of a new baby girl. I could have used different shades, but the result would have been a different look. (I could have used less saturated hues for a more subdued, antique look.) 

The initial ornament is a decent size.
Big enough to be seen on the tree
without overwhelming it. 
From there, I got to stitch it. I have to make sure I stop at the right time to add a backing so you don't see the backside of the embroidery once it's on the tree. The final step is to add the decorative stitched border and to cut out the shape. Oh, and add the ribbon, which involves using a large needle threaded with satin ribbon, so I can have it go through the ornament where I've reinforced it with a ring of embroidered satin stitches.  

I think the end result is perfect for a little girl. I hope the family loves it.  


Oh, and there's one more thing I like about these ornaments. Sometimes, you want to get a personalized gift but the name is unusual or there are several different spelling variations. (My own name of Michelle could be spelled as Michele, for example.) With just the initial, you can go with either the first name or the last name, and you don't have to worry about accidentally using the wrong spelling variation. 

Monday, July 29, 2013

Back Up Machine

A customer liked this large
messenger bag, but wanted
something smaller.
This is the smaller purse
that I created for her using
the same dragon embroidery,
which she wanted in purple.
Earlier this year, a customer contacted me about one of my bags. She loved the dragon embroidery, but wanted to be able to use the bag as a purse and, alas, a messenger bag was a bit big. Would it be possible to create a smaller version?

Of course, my answer was yes.

However, part-way through the project, I had a small snag with my sewing machine. A piece of thread got sucked down into the throat plate and I couldn't get it all out. So, I sent the Futura to be serviced and picked up a cheap back-up machine to finish off the job and for whenever the other one goes in for servicing in the future. Since the machine is supposed to be a backup, I didn't get anything terribly fancy or expensive - just functional and readily available at Target to finish a quick project that I knew would fit my specialty sewing feet. I got a Singer Brilliance:

How is it Overall? 
Originally, I planned to do a detailed review, as I did at one point with my Futura. However, after using it for a while, I decided it wasn't worth the effort of doing a full review. I only spent about as much on it as it cost to service and clean my other machine. And it shows.

Singer Brilliance in the Box
For example, I have it sitting on a very, very solid table, and it vibrates so horribly that I won't run it at full speed. It's also a lot louder than any sewing machine I've previously worked with. The other machines I've worked with in the past have had a place to place a spool horizontally as well as a holder in the back for large, vertical spools. This model does not have a spot in the back for large spools, which is a problem for me given the quantities of thread I go through. It also seems to be balanced poorly and I can't get into sleeves or other small places as easily as with other machines I've worked with in the past.

A part of me wonders whether I got a lemon right out of the box because I swear I smell something faintly funny when I use it. (Like a very faint whiff of something burning - but then again, I've also got a super-sensitive pregnancy nose right now and maybe it's because it's newly out of the factory? I'm planning to put in a call to customer service to ask.)

The controls are easy to navigate and there aren't too many things that can really be altered. I would say that this machine is OK if you're only occasionally doing a bit of light sewing. However, if you're planning to sew any more than one or two projects a year, you're probably better off buying a used machine off of craigslist that's older but better-built.

Wednesday, July 24, 2013

Easy Strawberry Cheesecake

One of my husband's co-workers specifically asked me for this recipe after I sent a bunch of it with my husband to the barracks work. One of his co-workers commented that it was better than the cheesecake served at the Cheesecake Factory.

This surprisingly easy strawberry cheesecake is a variation off of the New York-Style Cheesecake recipe found in The Cake Mix Doctor. I used fresh strawberries that were starting to dry out just a little bit, which probably reduces the amount of moisture in the finished cake. I wouldn't recommend using frozen berries as they just produce too much water.

Easy Strawberry Cheesecake
1 pkg. yellow cake mix
4 Tbsp butter, melted (1/2 a stick)
4 eggs
2 pkg. cream cheese (total of 16 oz.), at room temperature
1 can (14 oz.) sweetened condensed milk
1/2 cup vanilla Greek yogurt
2 1/2 Tbsp. lemon juice
1 Tbsp. vanilla extract
1 1/4 cups fresh strawberries, sliced

1) Heat oven to 325° Lightly grease a pan. I used two 9" round springform pans, but you could also use a 13 x 9 inch baking dish.

2) Set aside 1/2 cup of the cake mix for the filling. Place the rest of the mix (most of the box), melted butter, and 1 egg in a mixing bowl to make the crust. Mix until the batter makes a ball, then transfer it to your pan and spread evenly on the bottom and up the sides.

3) For the filling, mix the cream cheese and sweetened condensed milk in a mixing bowl. (The beauty of this recipe is that you don't need to clean the bowl and beaters you used to make the crust.) Blend until just combined, then add the 1/2 cup of reserved cake mix, remaining 3 eggs, Greek yogurt, lemon juice, and vanilla extract. Beat for a minute.

4) Stir in the fresh strawberries, then pour into the crust. Spread the filling around so that it's an even layer inside the crust.

5) Bake at 325° until the center doesn't jiggle when pan is shaken and top is kind of shiny. This will take at least 40 minutes. When it's done, transfer it into the fridge and let it cool there for at least an hour. Anything made with cream cheese seems to taste better the next day, and this is especially true for cheesecake. I try to let mine sit in the fridge a full day (or at least overnight) before serving.

Wednesday, July 10, 2013

Planning a Spring Garden in the Middle of Summer

At one point, I used to work at Green Spring Gardens, a horticultural demonstration garden in Fairfax County Virginia. It's a little-known gem of a park that is stuffed full of themed flower gardens showcasing species and varieties that do well in the Northern Virginia area. The gardeners there spent years planning and editing the gardens to include species that were not only atypical, but also thrived and provided beauty throughout the seasons of the year.

I learned that the best time to start planning for your spring garden was well before the bulbs traditionally show up for sale at the local garden center. The gardeners would walk through the gardens in spring, taking notes of what worked and what didn't and what needed more of a particular color where while the spring bulbs were still up. All of the gardeners there had their wish lists finalized and orders placed before mid-July (often, much sooner) in order to secure the best pricing and selection from mail order bulb suppliers.
Photo from a trip to Buschart Garden last spring.
My Bulb-planting Philosophy
I plant bulbs in blocks - intensive drifts which may end up having wide gaps of no bulbs between them at all. Why? Two reasons:

Wednesday, May 22, 2013

Cooking, Gardening, Stitching

Garden Duckie Apron
This apron seems to combine
3 things that are important to me:
Cooking, Gardening, Stitching
Summer grilling season is upon us.

In honor of the summer cookout season, I've decided to start posting recipes and the results of cooking experiments here for all of you to enjoy. Likewise, I plan to start posting bits and pieces related to gardening in addition to bits about what I've been stitching.

Why?

Because I have a degree in landscape management (urban horticulture + some business), and I want to be able to use it. My previous experience has mostly been with ornamental plants. However, you may catch bits and pieces about my vegetable garden this year.

Saturday, May 11, 2013

Pomegranate Molasses Apple Pear Cake

Have you ever encountered pomegranate molasses at an ethnic market? It's a syrup entirely from pomegranate juice, so it's an interesting way to incorporate the nutrients from this superfood into your baking. Although it has molasses in the name, it's not terribly sweet.

I managed to find some recently at a Pakistani/Indian food market, so I threw on an apron and got to work on an easy-to-make cake. The following has been adapted from the Old-Fashioned Pear and Ginger Cake recipe found in The Cake Mix Doctor by Anne Byrn:


3/4 cup dark brown sugar
3/4 stick butter (6 tbsp), melted
1 sm.can pear halves, sliced thickly
1 cooking apple (such as granny smith), sliced thinly
1pkg. yellow cake mix
1 cup whole milk
1/3 cup pomegranate molasses
1/3 oil
3 eggs
1 tsp. ground ginger
1 tsp. cinnamon

1. Preheat oven to 350°F. Rack should be in the middle of the oven.

2. Spread the bottom of a 9 x 13 pan with an even coating of melted butter and brown sugar. Arrange the bottom of the pan with sliced fruit. I sliced the pear thickly and the apple thinly to even out the cooking times (the pears were already cooked until soft during the canning process).

3. Mix remaining ingredients in a large mixing bowl until well combined. Pour over the fruit.

4. Bake 43-46 minutes - until the cake springs back lightly when pressed and starts to pull away from the sides of the pan.  Cool for 10 minutes before serving.

Serving Suggestion: Flip the cake upside down so that the fruit slices are visible on top.

Saturday, May 4, 2013

Squash Soup in a Crockpot

I've used this recipe for a variety of winter squash, including pumpkin, butternut, and hubbard  It's a great recipe for when you see squash at reasonable prices. For example, I traditionally make it each fall right after Halloween or Thanksgiving (I see no reason to toss the uncarved pumpkins I place on my porch for fall decor). I made it today after I found some calabaza squash at the grocery store.

The great thing about this recipe is that you can make it in the crock pot and the proportions are extremely forgivable. 
 * Onion - diced
* Garlic - minced
* Winter Squash - peeled and cut into pieces 
* 1 can diced tomatoes
* Chicken Stock - enough to cover the squash in the crock pot
* Salt, to taste
* Pepper, to taste
* 1 1/2 cup cooked rice (optional)
* 8 oz. Sour Cream
* Coriander, garnish

1. Cut up the squash. If you do not plan to blend the soup later, be sure to cut the pieces into bite-size chunks. Otherwise, you can get away with relatively large pieces. 

2. Add onion, garlic, tomatoes, and squash to crock pot. Add enough chicken stock (or water and bullion cubes) to barely cover the vegetables. Since it's a crock-pot recipe, the soup will not reduce significantly during cooking. 

3. Cook until the squash is tender. This will depend, in part, on how big the squash chunks are. 3-4 hours on high is definitely enough time even if you use large chunks. You can also cook it on low for longer periods of time. 

4. Add salt and pepper to taste. If desired, blend the soup into an even consistency using an immersion blender, or process it in batches using a food processor. 

5. Stir in rice. Toast a bit of crushed coriander. Add sour cream and coriander (either as a garnish or stirred into the soup).

6. Serve.